Halloween Witch Stuffed Cookies
This content may contain affiliate links. For more information, see our disclosure policy.


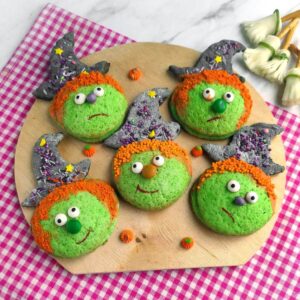
These Halloween Witch stuffed cookies are spooky, fun, and filled with sweet surprises. They’re a festive treat that are perfect for parties, trick-or-treating, or sharing with family.

Halloween has always been one of my favorite times to get creative in the kitchen. I love how it brings out a playful side in baking where spooky and fun come together in every treat. These Halloween Witch stuffed cookies are the kind of recipe that makes both kids and adults light up when they see them on the table.
For me, the best part about making themed desserts is the excitement they bring before anyone even takes a bite. I remember setting out a plate of these cookies last year, and they disappeared almost instantly. Everyone was curious to see what was hiding inside, and the surprise filling made them even more fun to enjoy. It’s that little extra detail that takes a simple cookie and turns it into a Halloween memory.
I also love that this recipe doesn’t just look festive, but it tastes incredible too. The cookies are rich and perfectly sweet, with a fun center that makes them stand out. They’re the kind of treat you can make ahead for parties, share with neighbors, or even tuck into Halloween goodie bags. Every time I bake them, it feels like I’m adding a little more magic to the holiday.
Items Needed
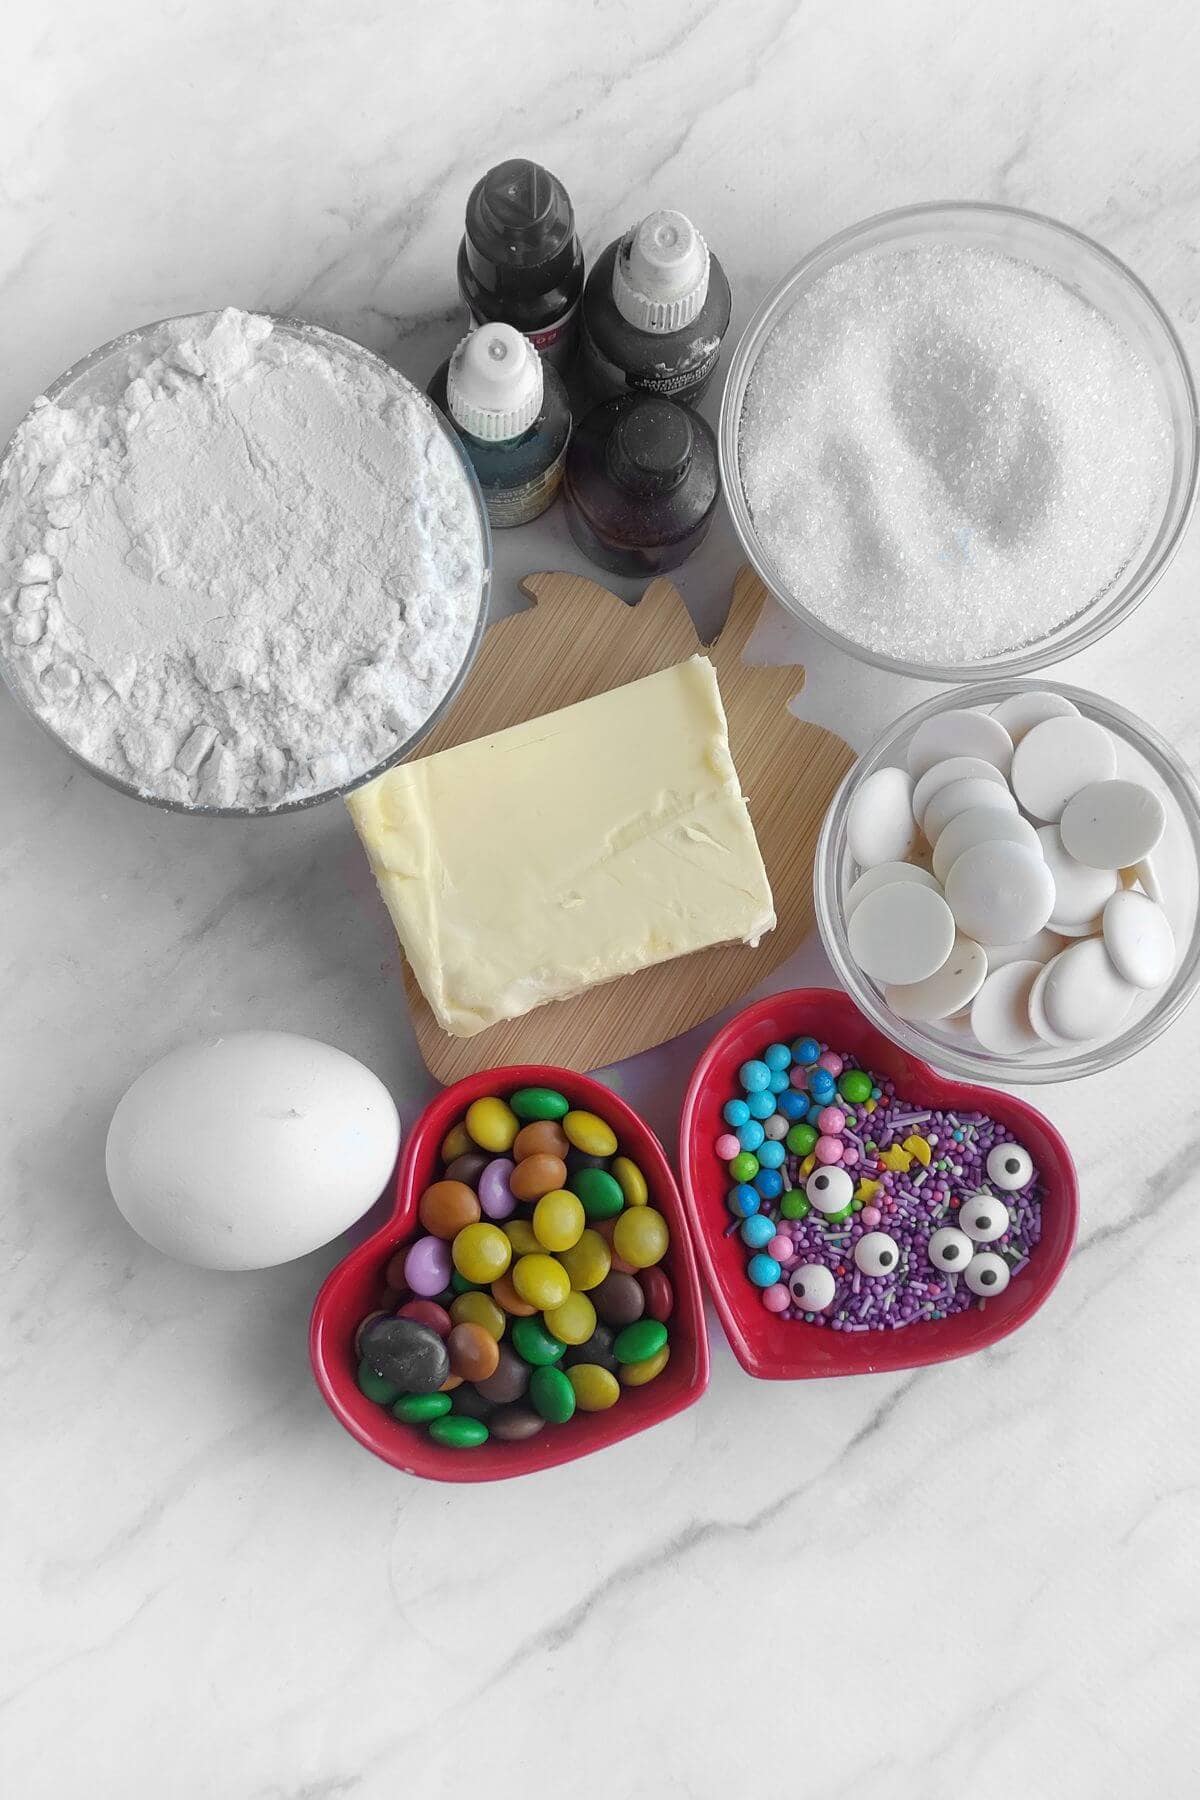
Here’s what you’ll need to make Halloween Witch stuffed cookies:
Dough Base:
- Butter (82.5%) – Adds richness, flavor, and tenderness to the cookies.
- Egg – Binds the ingredients together and helps the dough hold its shape.
- Water or milk – Provides moisture for a smoother, workable dough.
- Sugar – Sweetens the cookies and helps create a light texture.
- White flour – Forms the structure and base of the cookie dough.
- Green and black food coloring – Gives the cookies their festive Halloween witch-inspired look.
Decoration:
- Orange mini candies – Add pops of color and a fun Halloween touch.
- White chocolate – Melts smoothly for coating or drizzling and acts as a decorative glue.
- Orange food coloring – Tints the melted chocolate for a festive Halloween color.
- Coconut flakes – Create texture and a slightly spooky “witch hair” effect.
- Sugar eyes – Bring the witch character to life in a playful way.
- Sprinkle beads – Add sparkle, texture, and extra Halloween flair.
Tools you’ll need
Before starting the recipe, you’ll want to have all your kitchen essentials ready. I recommend having the following items:
Ways To Customize
- Change the colors with different food coloring to match holidays or themes.
- Swap the filling for candies, chocolate, or seasonal treats.
- Add toppings like sprinkles, nuts, or flavored drizzle.
- Play with flavors by adding spices (cinnamon, pumpkin spice, etc.) or extracts (vanilla, almond, mint).
- Shape them differently for fun variations (like mini versions or themed cutouts).
Be sure to check out the full recipe and ingredient list below.
How To Make It
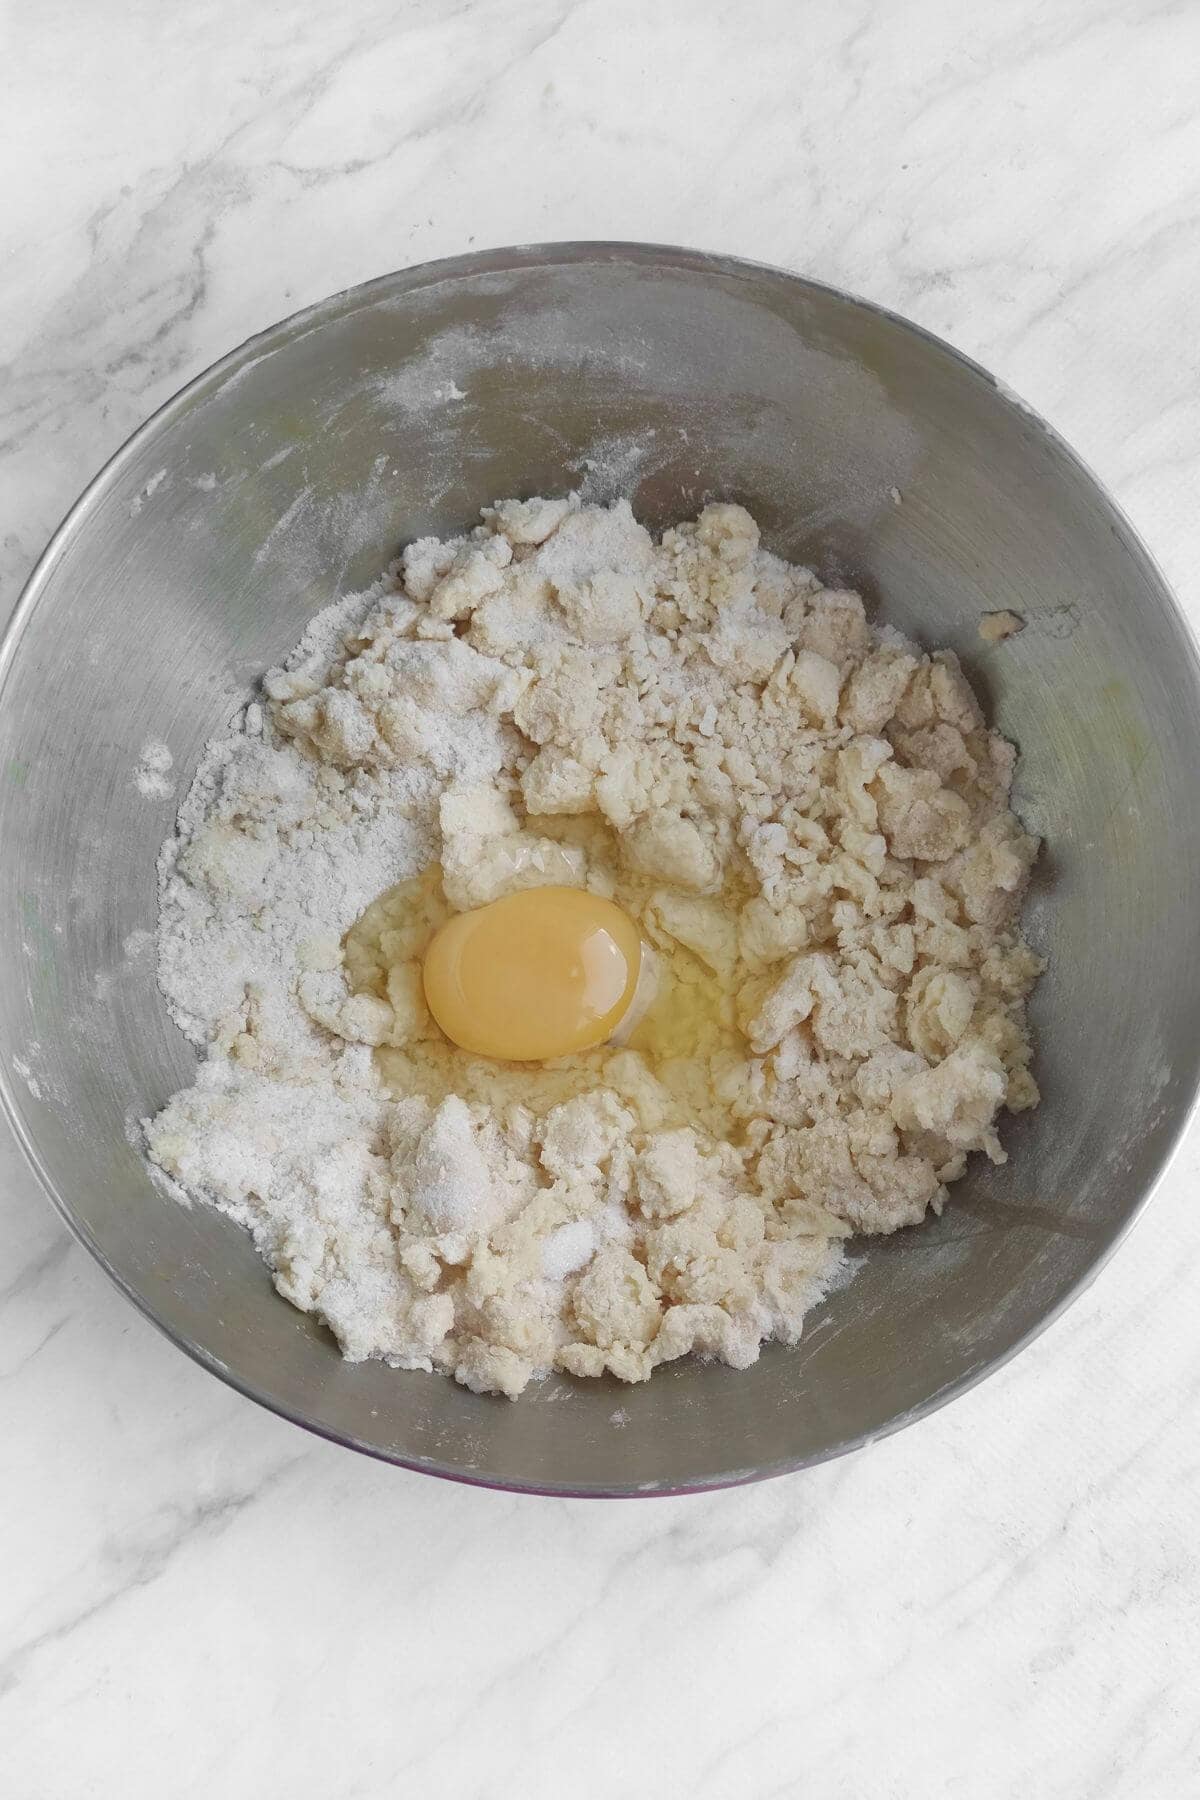
Rub flour, sugar, and butter into flakes. Add egg and water. Knead into soft, pliable dough.
Color 1/3 of the dough black. Set aside. Color the remaining dough green. Roll it out into a layer.
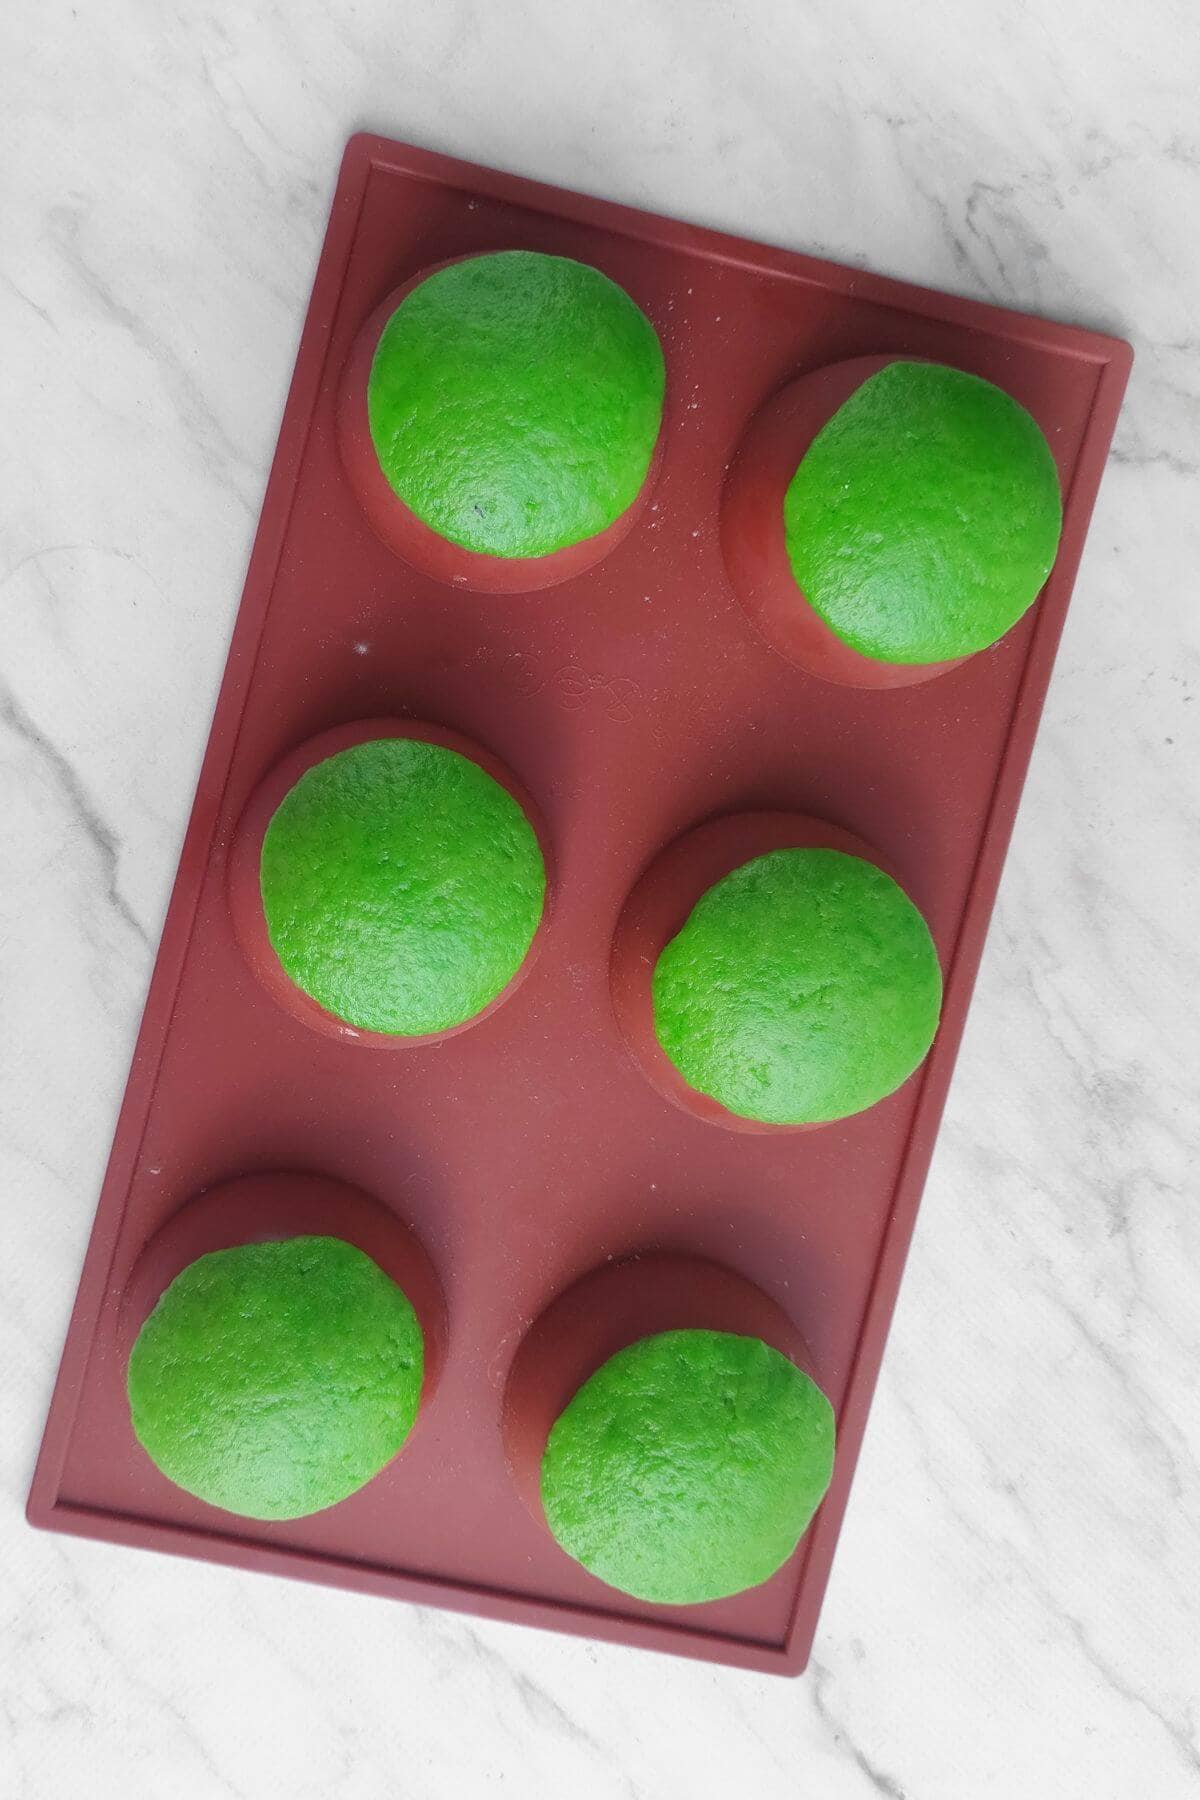
Form six circles about 2 1/2 inches in diameter. Place them on a silicone half-moon mold. Bake in a hot oven at 350°F until the edges are golden brown. Cool the blanks, align the edges on a fine grater.
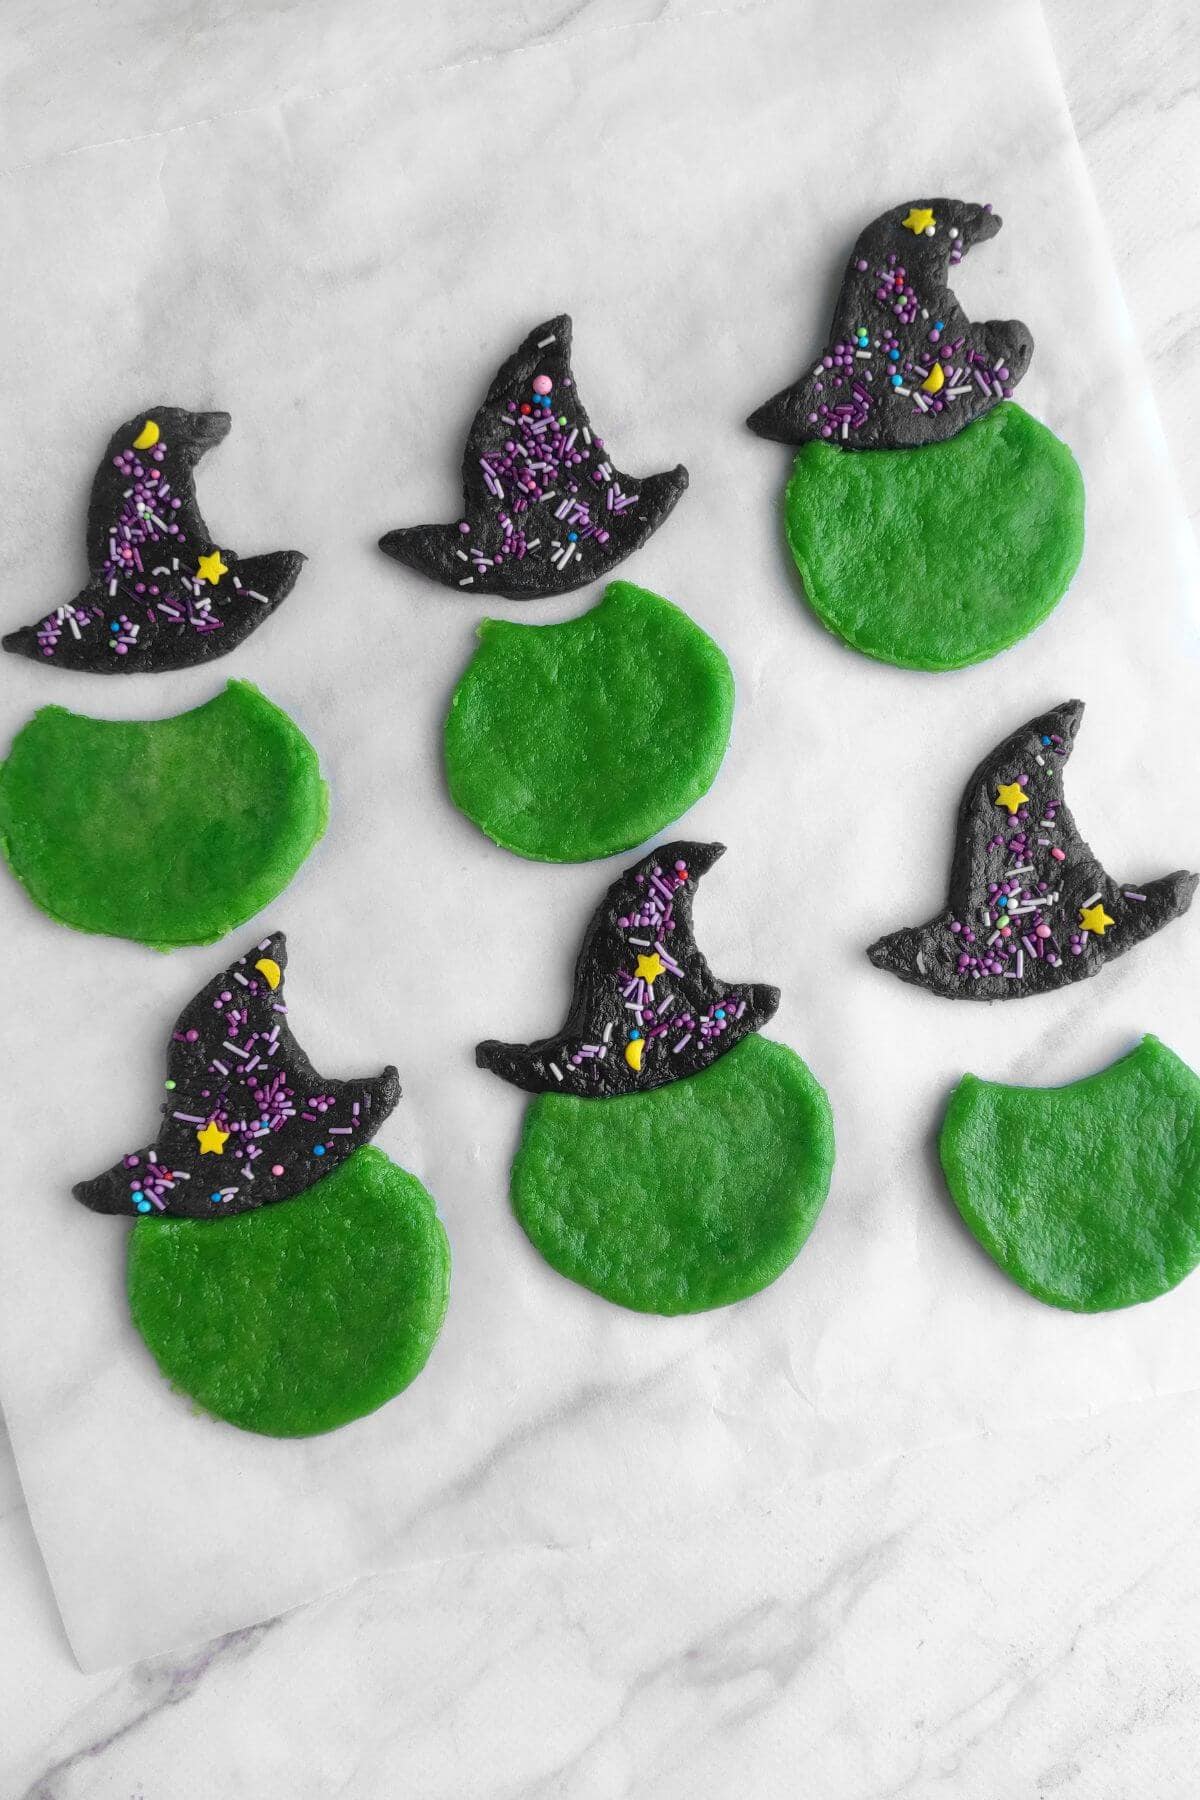
From the green dough, rolled out into a layer, form six circles with a diameter of 2 ounces. Place the circles on parchment paper. Roll out the black dough. Using a mold or template, cut out the caps, sprinkle with purple sprinkles. Remove a sector from the green circle so that they can be connected. Grease the joints of the cap and circle with water and press the edges. Bake the base for 8-10 minutes. Cool.
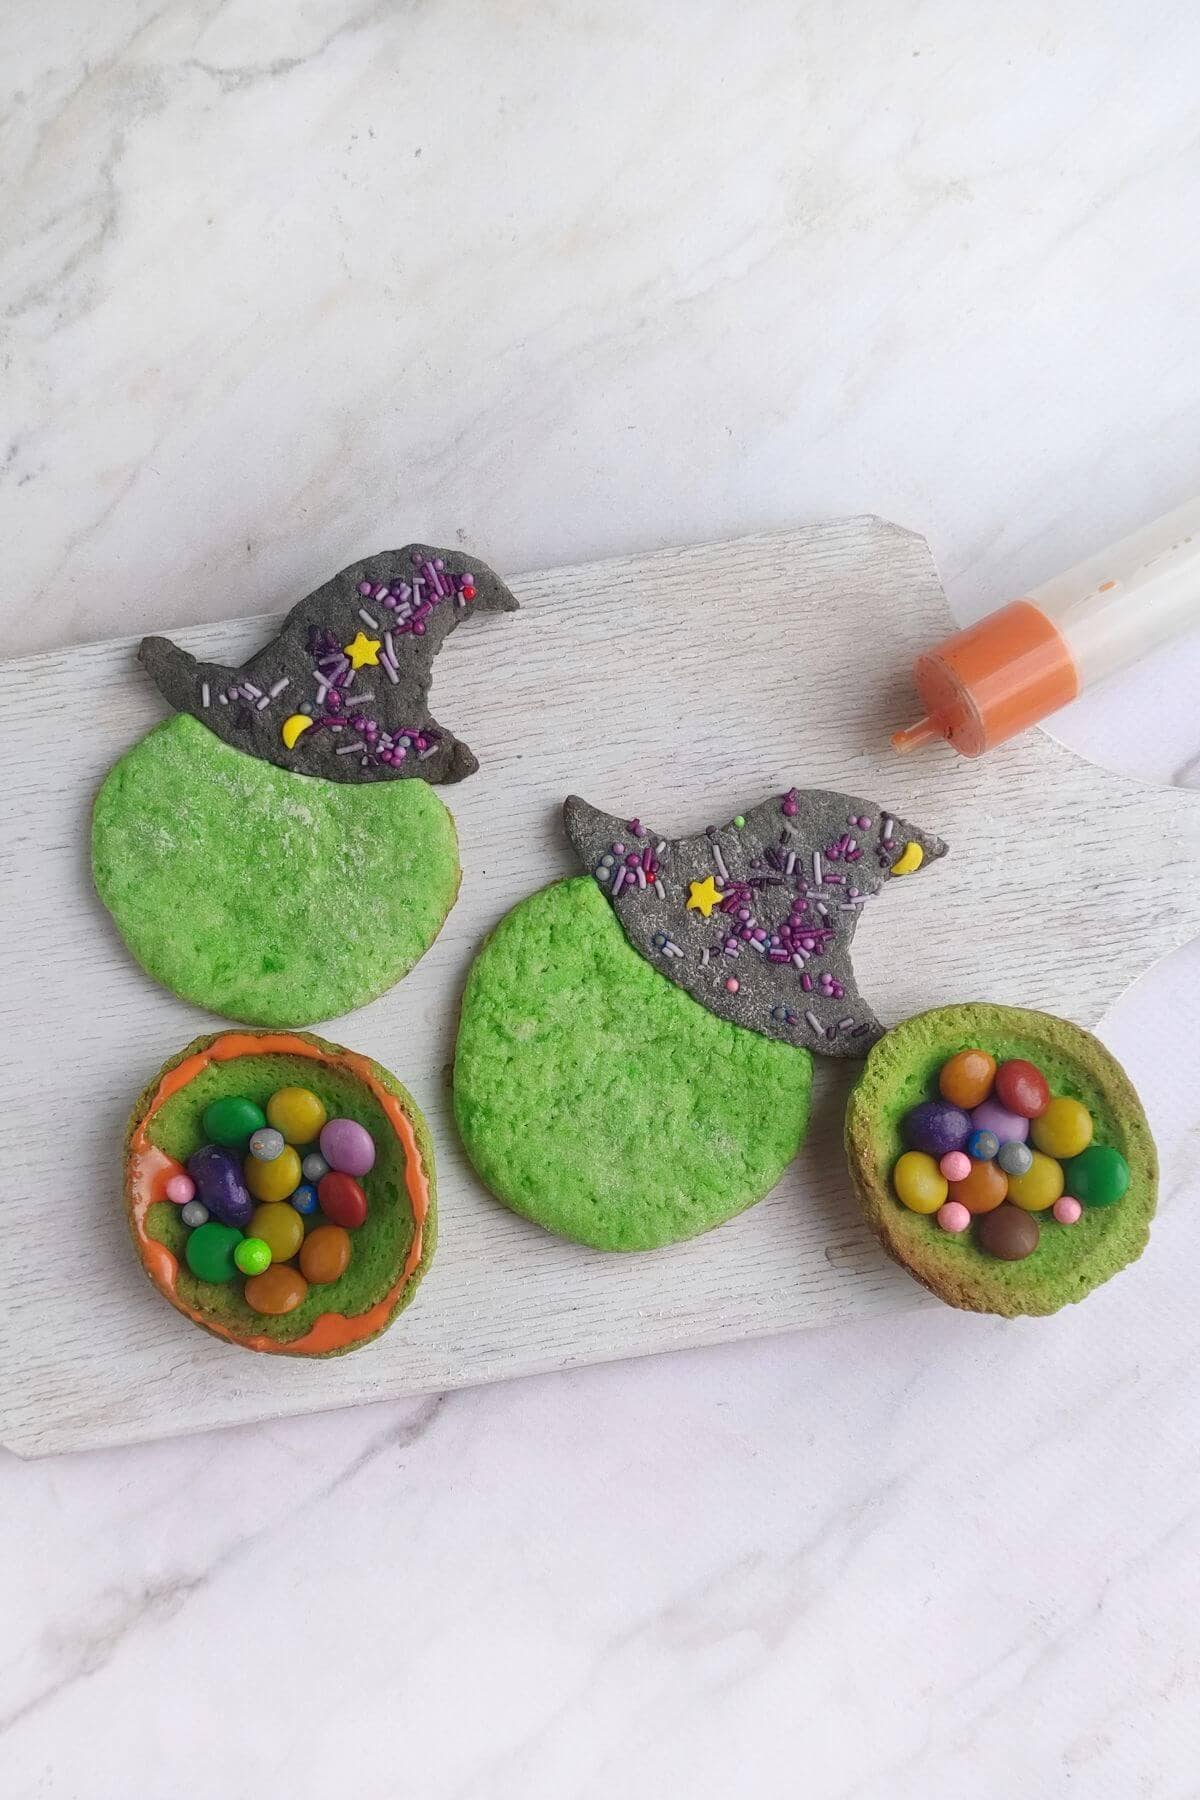
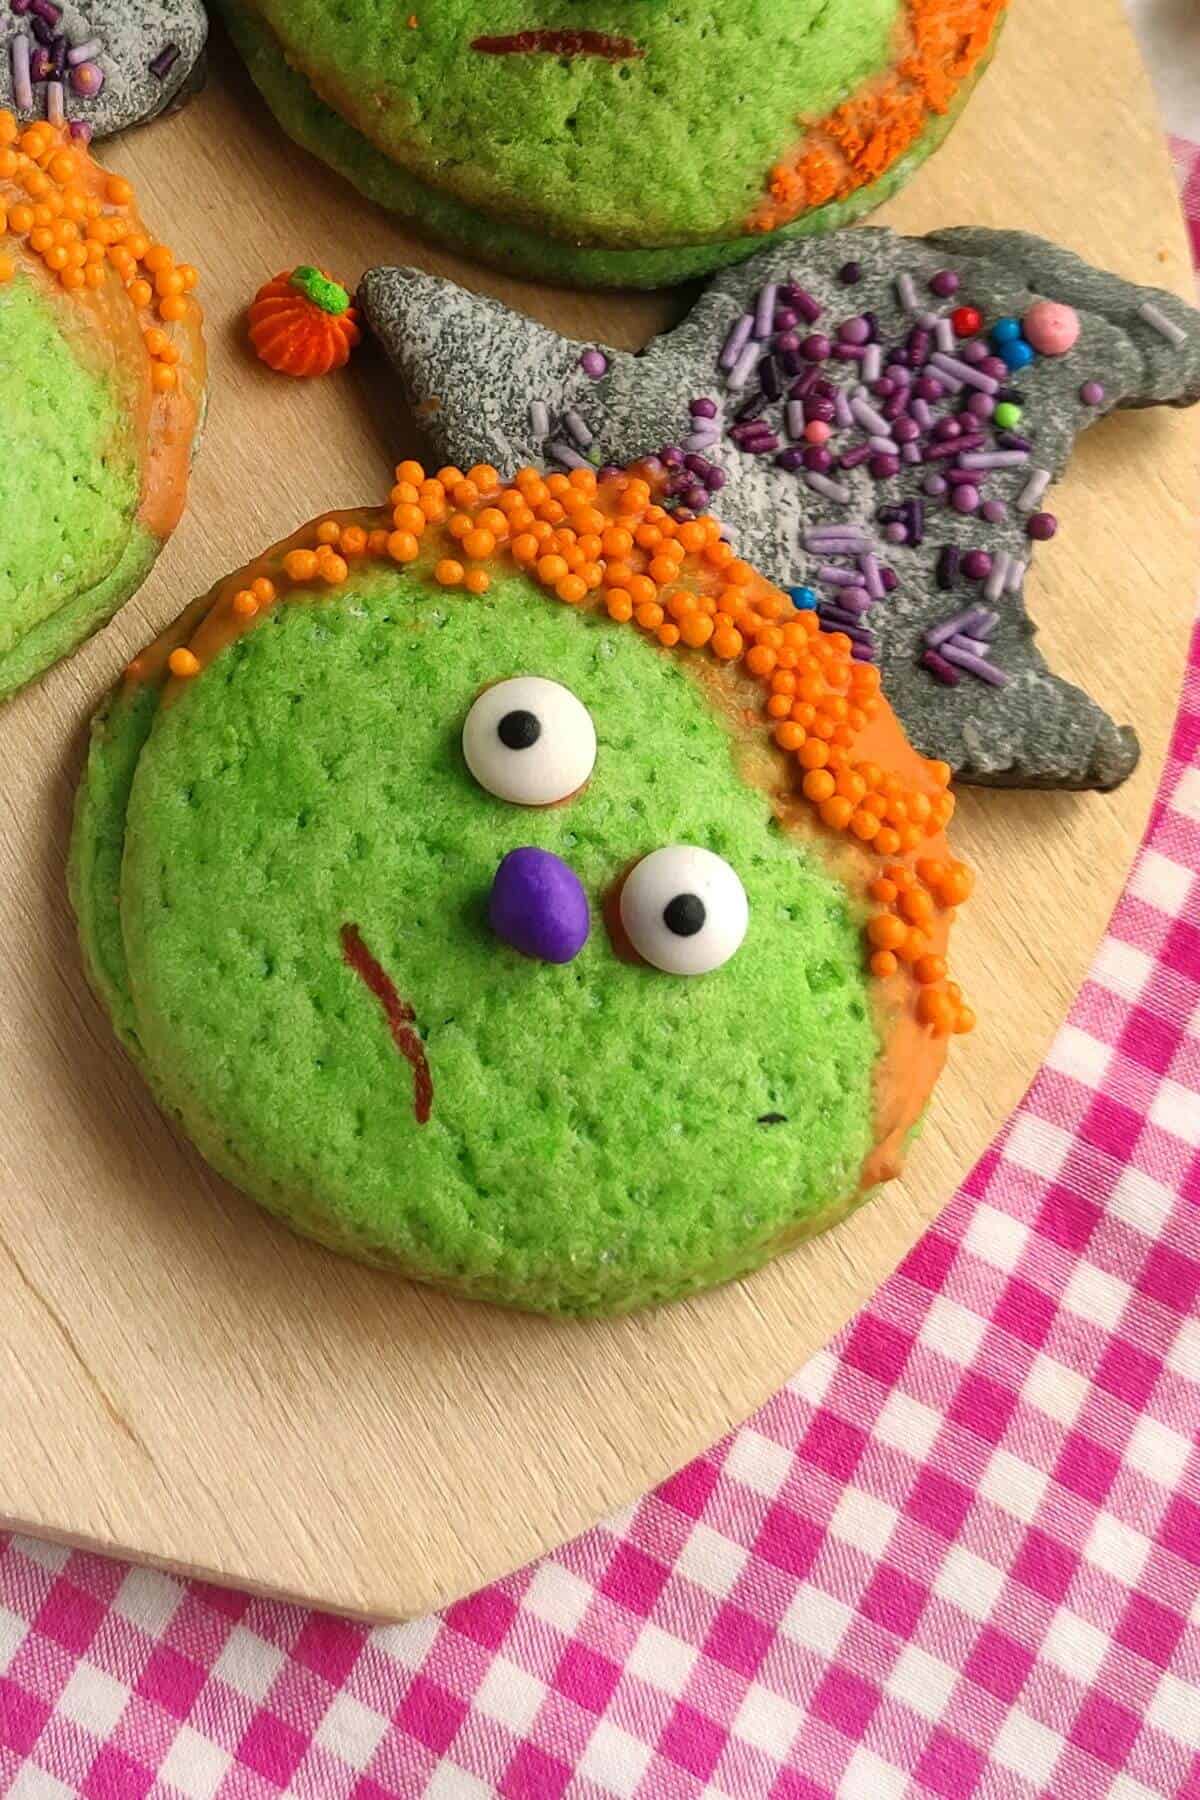
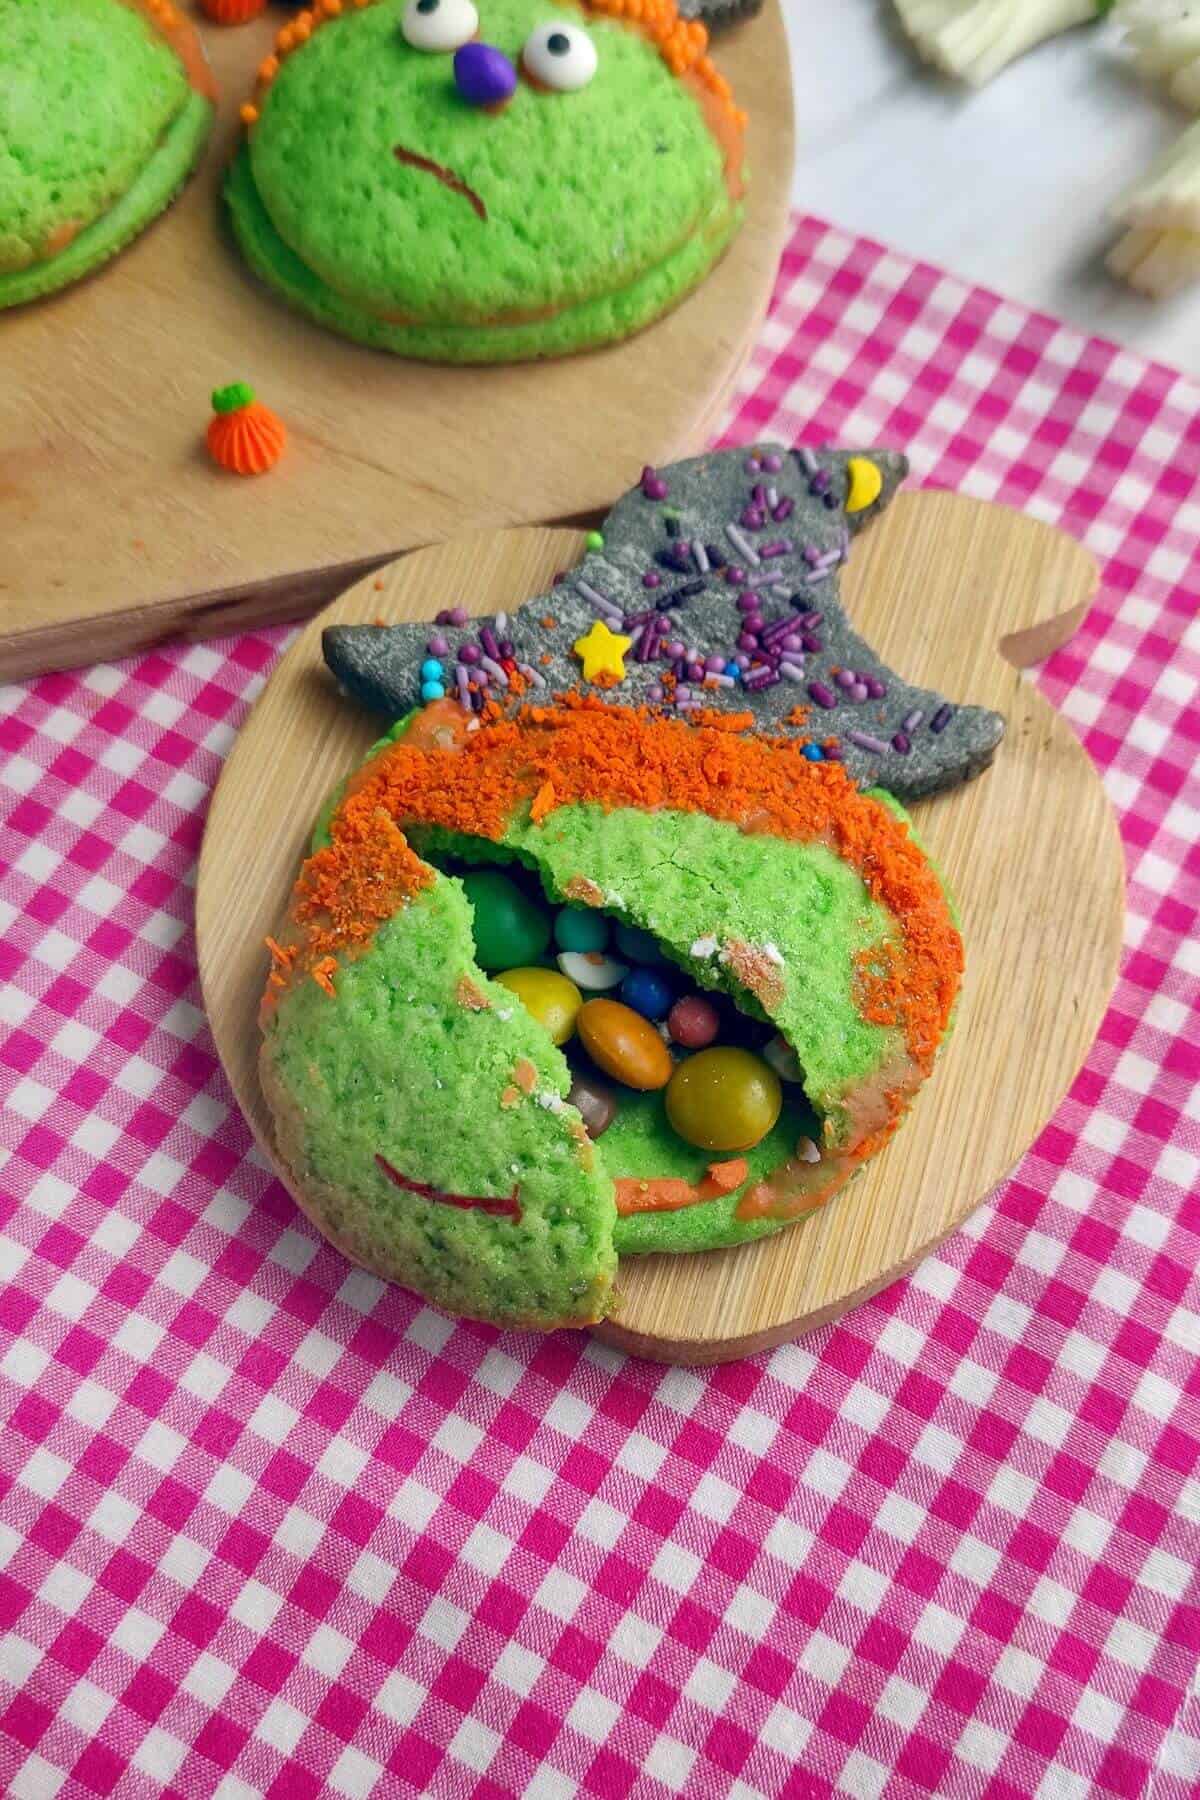
Melt white chocolate in a double boiler until the consistency of condensed milk. Color it orange. Place the candies in a concave blank, grease the edges with chocolate. Cover it with the base, press and turn it over. Cover the hair area with chocolate, sprinkle with shavings or mini-balls. Attach noses and eyes to the chocolate. Draw details with a food marker.
Serve them on Halloween or pack them in clear plastic bags as edible gifts. Happy Halloween!
Note
Chill the dough for at least 15–20 minutes before shaping—it makes the cookies easier to handle, helps them keep their shape, and gives a better texture after baking.
Storage
You can store Halloween Witch stuffed cookies in an airtight container at room temperature for up to 4 days to keep them soft and fresh. If you’d like to keep them longer, place them in a sealed container or freezer bag and freeze for up to 2 months.
To enjoy them warm again, simply pop a cookie in the microwave for about 10–15 seconds or heat it in a low oven for a few minutes until just soft and gooey inside.
Helpful Hints
Pro tip: Prepare Ahead!
Always let the cookies cool slightly before decorating so the chocolate and candies don’t melt or slide off.
- Use room temperature butter and egg for smoother dough.
- Line your baking sheet with parchment paper for easy cleanup.
- Don’t skip chilling the dough. It helps prevent spreading.
- Add decorations while the chocolate is still soft so they stick well.
- Store cookies in single layers with parchment between to avoid smudging.
Serving Suggestions
These Halloween Witch stuffed cookies are perfect for serving at parties or family gatherings. Arrange them on a festive platter with some colorful candies scattered around for extra Halloween flair. Kids especially love grabbing them straight from the tray, and the fun surprise inside always gets a big reaction.
For an even sweeter treat, pair these cookies with a creamy drink like my White Chocolate Milkshake. The combination of a rich, cold milkshake and a chewy, chocolatey cookie makes for a fun and indulgent dessert spread. It’s also a great way to balance out the spookiness with something comforting and familiar.
If you’re planning a Halloween brunch or want to serve a variety of themed treats, try adding these cookies alongside my Oreo Pancakes. The playful look and flavors of both recipes make them a hit for any holiday table. Together, they create a spread that’s not just delicious but also full of character and Halloween spirit.
FAQs
Recipe
Witch Halloween Stuffed Cookies
Ingredients
Dough base:
- 2 ounces butter
- 1 egg
- 1-2 tablespoons water or milk
- 1/3 cup sugar
- 1 cup white flour
- green and black food coloring
Decoration:
- orange mini candies
- 1/4 cup white chocolate
- 2 drops orange food coloring
- 1 teaspoon coconut flakes
- 12 sugar eyes
- sprinkles beads
Instructions
- Rub flour, sugar and butter into flakes. Add egg and water. Knead into soft pliable dough.
- Color 1/3 of the dough black. Set aside. Color the remaining dough green. Roll it out into a layer
- Form six circles about 2 1/2 inches in diameter. Place them on a silicone half-moon mold. Bake in a hot oven at 350°F until the edges are golden brown. Cool the blanks, align the edges on a fine grater.
- From the green dough, rolled out into a layer, form six circles with a diameter of 2 ounces. Place the circles on parchment paper. Roll out the black dough. Using a mold or template, cut out the caps, sprinkle with purple sprinkles. Remove a sector from the green circle so that they can be connected. Grease the joints of the cap and circle with water and press the edges. Bake the base for 8-10 minutes. Cool.
- Melt white chocolate in a double boiler until the consistency of condensed milk. Color it orange. Place the candies in a concave blank, grease the edges with chocolate. Cover it with the base, press and turn it over. Cover the hair area with chocolate, sprinkle with shavings or mini-balls. Attach noses and eyes to the chocolate. Draw details with a food marker.
- Serve them on Halloween or pack them in clear plastic bags as edible gifts. Happy Halloween!
Notes
- Use room temperature butter and egg for smoother dough.
- Line your baking sheet with parchment paper for easy cleanup.
- Don’t skip chilling the dough—it helps prevent spreading.
- Add decorations while the chocolate is still soft so they stick well.
- Store cookies in single layers with parchment between to avoid smudging.